Connecting GitHub Actions to Entra ID with OIDC and federated credentials
Table of Contents
Introduction
This post takes you through configuring Microsoft Entra ID and GitHub Actions for OIDC (OpenID Connect) through Federated Identity Credentials (Step 1 to Step 3).
Step 4 onwards continues to take you through fully setting up Terraform securely including Microsoft Graph permissions, Azure access, GitHub environment protection, and repository secrets using the Entra ID as Code repository repository as an example.
flowchart LR
  workflow[GitHub Actions workflow]
  oidc[GitHub OIDC provider]
  token[Short-lived OIDC token<br/>issuer, audience, subject]
  app[Microsoft Entra app registration<br/>federated identity credential]
  principal[Terraform service principal]
  graphNode[Microsoft Graph<br/>application permissions]
  azure[Azure subscription<br/>RBAC permissions]
  state[Azure Blob Storage<br/>Terraform state]
  firewall[Storage firewall rule<br/>runner IP]

  workflow -->|Requests token| oidc
  oidc -->|Issues| token
  token -->|Claims match| app
  app -->|Represents| principal
  principal -->|Manages Entra resources| graphNode
  principal -->|Uses Azure roles| azure
  principal -->|Reads and writes state| state
  workflow -.->|Must pass before apply| environment
  workflow -.->|Temporarily updates| firewall
  firewall -.->|Protects access to| state
What this setup gives you
- Passwordless CI authentication from GitHub Actions to Entra ID.
- No long-lived client secret in GitHub.
- Scoped access for Terraform plan and apply workflows.
Step 1: Get your GitHub repository IDs
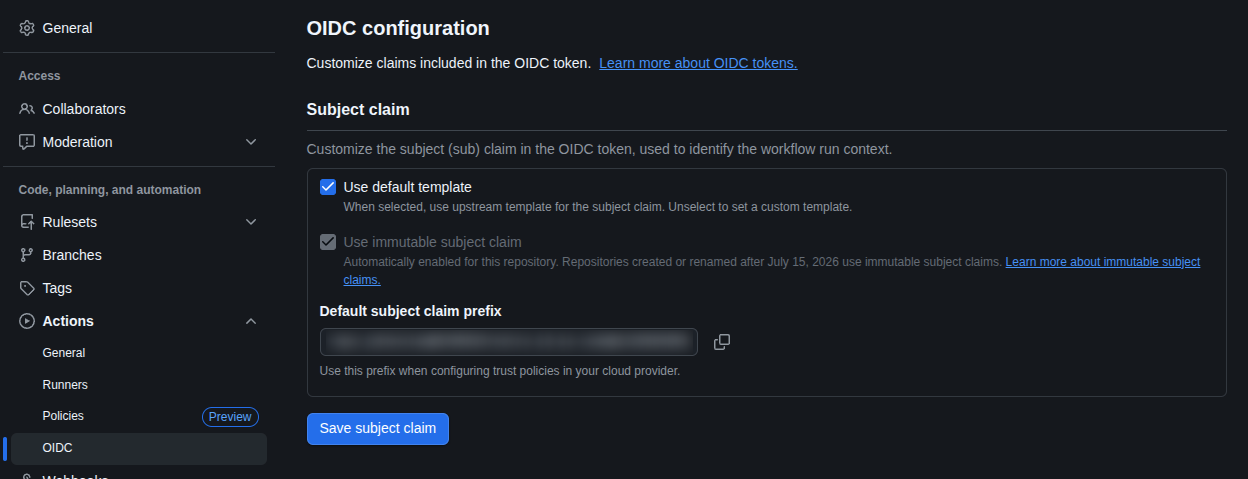
- Open the GitHub repository that will run Terraform.
- Select Settings in the repository navigation.
- In the Security section, then Actions.
- Scroll to OIDC to open the repository's OIDC configuration page.
- Record the Organization ID and Repository ID shown on the page. Ensure
Use immutable subject claimis checked to see these values.
Step 2: Create the app registration
Example script and README to set this up can be found in the following links
- Documentation: GitHub Service Principle
- PowerShell Script: GitHub Service Principle PowerShell Script
- Open the Entra admin centre.
- Go to Identity > Applications > App registrations.
- Select New registration.
- Enter a name, for example
terraform-entra-id-as-code. - Keep the default account type unless your tenant needs multi-tenant access.
- Select Register.
Save these values from the app overview page:
- Application (client) ID.
- Directory (tenant) ID.
Step 3: Create federated identity credentials
Add one credential for pull requests and one for main branch apply.
These credentials distinguish workflow contexts; credentials on the same application share its permissions.
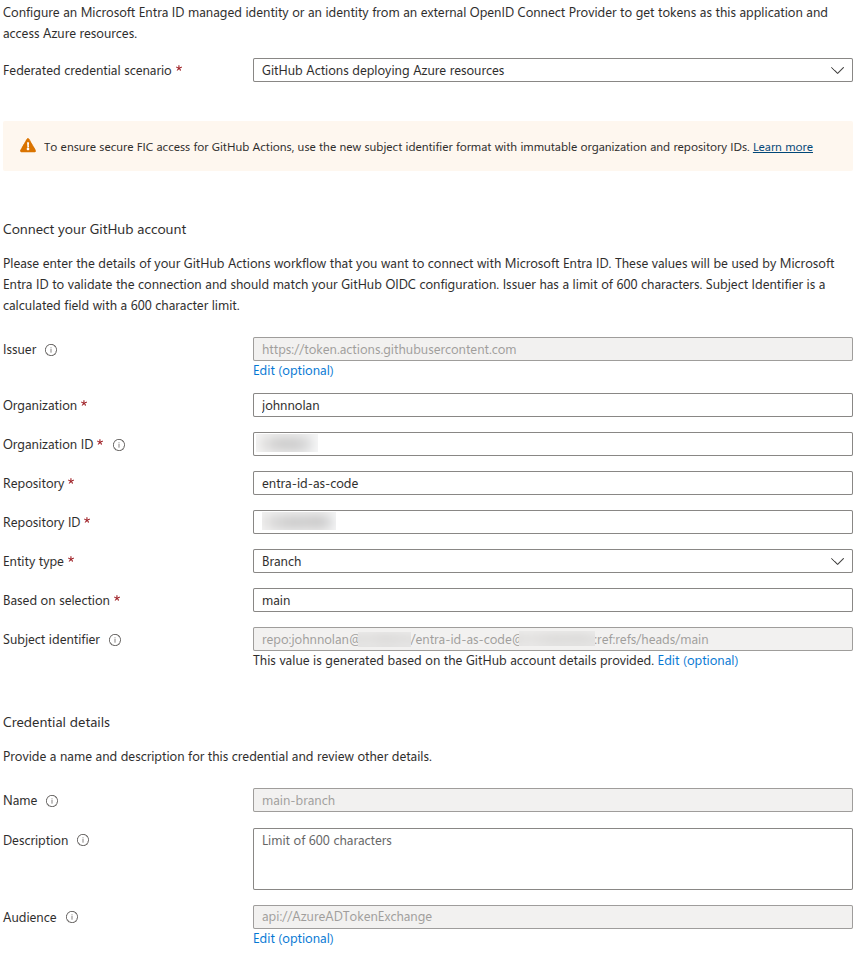
- Open your app registration.
- Go to Certificates & secrets > Federated credentials.
- Select Add credential.
- Choose GitHub Actions deploying Azure resources.
Credential A: pull request plan
Set these fields:
- Organization:
johnnolan - Repository:
entra-id-as-code - Entity type: Pull request
- Name:
github-pr-plan
Expected subject identifier format:
repository_owner_id:ORGANIZATION_ID:repository_id:REPOSITORY_ID:context:pull_request
Credential B: production apply
Set these fields:
- Organization:
johnnolan - Organization ID:
github_organization_id - Repository:
entra-id-as-code - Repository ID:
github_repository_id - Entity type: Environment
- Environment name:
production - Name:
github-main-apply
Expected subject identifier format:
repository_owner_id:ORGANIZATION_ID:repository_id:REPOSITORY_ID:context:environment:production
See GitHub OIDC subject guidance.
Verify issuer and audience
For both credentials, ensure these values are set:
- Issuer:
https://token.actions.githubusercontent.com - Audience:
api://AzureADTokenExchange
At this point, GitHub and Microsoft Entra ID are configured to trust each other for the workflow contexts you selected. If you only need to establish federated authentication, the setup is complete. Continue with the remaining steps to reproduce the full Terraform setup, including Microsoft Graph permissions, Azure access, GitHub environment protection, and repository secrets.
Step 4: Grant Microsoft Graph application permissions
The AzureAD provider calls Microsoft Graph (Entra directory API). Grant only the roles your Terraform resources require.
- Open app registration.
- Go to API permissions.
- Select Add a permission > Microsoft Graph > Application permissions.
- Add the required Graph roles for your managed resources.
- Select Grant admin consent.
Common required roles can include:
Policy.Read.AllPolicy.ReadWrite.ConditionalAccessEntitlementManagement.ReadWrite.All
For a list of roles needed, review each Terraform file in the Terraform directory. Each file contains the permissions required to run.
Step 5: Grant Azure RBAC for remote state
The Terraform backend uses Azure Blob Storage (state file stored in a storage account). Assign RBAC (role-based access control, authorisation by role assignment) so the app can read and write state.
Example for securing the Storage Account can be found at this link: Storage Account Network Hardening
- Create/Open your storage account to be used for Terraform state.
- Go to Access control (IAM) > Add role assignment.
- Assign Storage Blob Data Contributor.
- Scope the role to the storage account or state container.
- Select the service principal for your app registration.
Step 6: Create the production environment
GitHub deployment environments
The apply workflow uses a GitHub environment named production. The environment connects the deployment job to its approval rules and to the environment-specific subject trusted by the Entra federated credential.
- Open the repository in GitHub.
- Select Settings > Environments.
- Select New environment.
- Enter
productionas the environment name and select Configure environment. - Under Deployment protection rules, enable Required reviewers and add the people or teams who must approve a production deployment.
- Under Deployment branches and tags, choose Selected branches and tags.
- Add
mainas the allowed deployment branch. - Save the environment protection rules.
The name must be exactly production. The apply workflow passes that name to the reusable workflow, and the federated credential trusts the corresponding environment subject. Branch restrictions matter because the apply workflow also supports manual dispatch.
Step 7: Configure GitHub repository secrets
In GitHub, go to Settings > Secrets and variables > Actions.
Add the secrets used by this repository workflows. Plan callers inherit repository secrets without selecting an environment. Apply uses production, where environment secrets can provide a separate identity if you require.
| Secret | Value |
|---|---|
ARM_CLIENT_ID |
Application client ID |
ARM_TENANT_ID |
Entra tenant ID |
ARM_SUBSCRIPTION_ID |
Subscription containing the backend storage |
TFSTATE_RESOURCE_GROUP_NAME |
Storage account resource group |
TFSTATE_STORAGE_ACCOUNT_NAME |
State storage account |
TFSTATE_CONTAINER_NAME |
State container |
TFSTATE_KEY |
State blob name |
Step 8: Confirm workflow permissions
Entra ID as Code Example Workflows
Your workflow must request the OIDC token.
Check that workflow files include:
permissions:
  id-token: write
  contents: read
Step 9: Validate end-to-end
- Open a pull request that changes Terraform files.
- Confirm the plan workflow completes successfully.
- Merge the pull request to main.
- Review and approve the waiting
productiondeployment, then confirm the apply workflow completes successfully.
Troubleshooting
| Failure | First checks |
|---|---|
AADSTS70021 or subject mismatch |
Compare issuer, audience, and subject; allow for propagation after credential changes |
| Graph reports insufficient privileges | Check application roles and administrator consent for the failing resource |
| Backend access denied | Check the selected identity, blob role scope, storage settings, and network access |
| Storage firewall update denied | Check Azure management permissions for that operation |
Microsoft documents a propagation delay after federated credential changes. A newly saved credential may need time before token exchange succeeds, including when Entra returns AADSTS70021.